DESCRIPTION: Slate is basically squashed mud and silt from ancient oceans and river beds subjected to tremendous pressures in a hot environment deep underground. Eventually being forced to the surface by the collision of continents. Slate is hundred’s of million’s of years old. It is possible to get deposits of limestone and marble pebbles or stones, which crush between the layers of silt and then harden to form a calciferous deposit. This is normally visible on the surface of slate after it has been split. It is not a defect, but a natural characteristic of the stone. Aesthetically these deposits are not always appealing, so the following is a guide, which should help aid their removal.
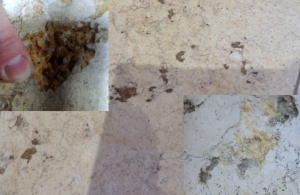
 LTP Grout Stain Remover or LTP Cement, Grout & Salt Residue Remover is applied to the surface.
The moment it makes contact with the calcium carbonate deposit it begins to dissolve.
Agitating the surface using a black emulsifying pad aids removal without damaging. Make sure to clean the whole surface and not just the deposit. Rinse well with plenty of water.

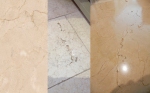
Once dry the surface is sealed with LTP Colour Intensifier and Stainblock.
After treatment the slate should appear darker. This also helps to further disguise the blemish that is left following the removal of the calcium carbonate deposit.
Sealed surfaces should be maintained with a mild PH detergent such as LTP Waxwash.
Repeated use of stronger detergents for maintenance can cause un-necessary damage.
INITIAL CLEANING: LTP GROUT STAIN REMOVER OR LTP CEMENT, GROUT & SALT RESIDUE REMOVER 1ltr & 5ltr
 This should be done after fixing and before sealing and grouting to remove calcium carbonate deposits, dust and dirt that have accumulated during the production and fixing process. Apply undiluted solution to the surface of the stone and agitate immediately with an emulsifying pad. Rinse thoroughly with a separate pot of clean fresh water. Wipe away the released calcium dirt and grime with a mop or sponge and water and leave to dry for 24 hrs
https://www.ltp-online.co.uk/prod/ltp-grout-stain-remover
https://www.ltp-online.co.uk/prod/ltp-cement-grout-and-salt-residue-remover
SEALING: LTP COLOUR INTENSIFIER 500ml, 1ltr & 5ltr
 Before grouting apply a coat of LTP Colour Intensifier & Stainblock, check that all of the sealer has been fully absorbed within 40 minutes, any excess that remains on the surface after 40 minutes should be worked in with a soft cloth or buffing machine. Leave for a further 4 hours or overnight before grouting the joints. Once all residual grout has been removed and the surface and joints are thoroughly dry; apply a final coat of sealer covering the joints as well. Buff to remove any excess within 40 minutes and then leave for a minimum of 3 days to fully harden before making excessively wet.
https://www.ltp-online.co.uk/prod/ltp-colour-intensifier-and-stainblock
MAINTENANCE: LTP WAXWASH 1ltr & 5ltr
DAILY/WEEKLY
- Add 1 cap full of LTP Waxwash per litre of warm water. Apply to the surface with a mop to remove daily dirt and leave to dry. Does not require rinsing. Using the correct low ph maintenance cleaner will help to increase the life of the seal.
https://www.ltp-online.co.uk/prod/ltp-waxwash
IMPORTANT NOTES:
When cleaning or sealing vertical surfaces start at the top and work down.
Provided the surfaces are correctly sealed and maintained protection should last 4 – 5 years before considering applying a top up coat. Sealing will not prevent wear from abrasion.
After Intensive cleaning to remove any ingrained dirt or other staining and once dry, always test for moisture ingress. If evident cleaned areas should be re-sealed.
When using LTP Grout Stain Remover or LTP Cement, Grout & Salt Residue Remover, gloves should be worn and ensure you fully read & understand the directions for use.
For detailed application instructions please see Technical Data Sheets.


 COMPROMISED IMPREGNATING SEALER?